Yesterday, we went through the first of three stages in our preparation of GFP. This involved induction of expression of the GFP gene that was under the control of the inducer, IPTG. Cells were then harvested by centrifugation, and the enzyme lysozyme was added to effect release of soluble proteins including our GFP. The experiment required planning and organisation and I would like to suggest the use of a flow diagram in your lab books to organise your thoughts and to remind you of what comes next in your experiment. In the above example a simple diagram helps identify the key steps and allows you to note the volumes of reagents, times of incubations and can be further annotated with observations. What did the pellet look like? What was its approximate volume? Where there any differences between replicates etc. All of this in my view, helps you get through the experiment quickly and acts as a strong reminder when writing up the experiment at the end.
Key words flow diagram, flow chart, experimental planning, protein extraction, GFP
 The first step in developing a robust system for the production of recombinant GFP, requires knowledge of the growth characteristics of the host organism; in our case Escherichia coli. The standard approach to obtaining this information is to measure the rate of growth of the organism under defined conditions. It may also be useful to determine to what extent factors such as temperature, growth medium composition and pH, vessel configuration, aeration rates etc., influence the yield of cells. The method we shall use, and indeed you have developed yourselves (with a little bit of help), is to monitor growth over time using a spectrophotometer to accurately measure the turbidity (cloudiness) of a liquid culture at a set of well defined time points.
The starting point and the end point of the experiment should be considered in planning your schedule. This is where you need to think carefully about managing your time and organising materials and equipment. I wont give away the method completely, but you might want to think about the following elements of the experiment.
1. What volume of culture should I use? Why?
2. What is the best inoculum to use (loop or defined volume) and how could I determine this empirically?
3. What is the likely time taken for sufficient numbers of cells to populate the culture tube making detection possible. (Hint, you already have your own data on plate and broth cultures). Discuss this with your colleagues.
4. What sample volume is ideal for recording time points?
5. What solution should I use as a "blank"
6. Why did I suggest placing your first sample on ice today?
7. Are there any consequences of depleting the culture during the experiment?
8. What are the growth characteristics of bacterial cultures that have been described in class or on the Internet (e.g. Wikipedia)
9. Should I make single, duplicate or triplicate measurements, or maybe team up with colleagues? Pros and cons?
10. How should I record and plot my data?
11. What should I do after plotting my data?
12. What do other students' data look like and can I rationalise the results?
Key words Growth curve, E.coli, temperature, pH, aeration, spectrophotometry, blanks, culture, medium, planning, time management, organisation
This week has seen us return to bench work and as you know we are set on a course to purify our own Green Fluorescent Protein before Christmas. Over the last few days, you will gave become used to my sarcasm over your economic approach to the use of adjectives? One of the most important aspects of Scientific endeavour is the ability to make careful observations....and record them concisely and quickly. In addition, you should write up your methodology in a way that will enable you (and anyone else)to obtain the same set of experimental results. Finally, you must label all of your samples carefully, so that you can locate your plate or tube after a day, a week or a year, if necessary.
As you will have noticed I pushed you to describe the plates above (well your own poured and inoculated plates) in detail. I was looking for comments on
Percentage coverage of the plate
Distribution of the colonies
Shapes and sizes of the colonies
Colour and appearance of the colonies
Sizes of (and shape) single colonies (did you use the magnifier?)
Number of colonies estimated by "sectoring" the plate
Did the culture have any characteristic smell?
Was there any evidence for contamination?
You can read more at one of my earlier Blog Posts http://utcinnovationlabs.blogspot.co.uk/2014/06/elementary-my-dear-watson.html
Key words Observation Recording findings
 This week we have started BLASTing again in Y12 classes and by the end of the first weekly sessions, all of you will have gone through the basic steps. I walked around at the end of each session yesterday and checked that you had all worked through the CFTR primary structure search and then your own searches looking at the human h(a)emoglobin alpha chain sequence similarities across the species. I wanted to just add a reminder for the two key sites and in particular to encourage you all to sign up for an NCBI account: it will store all of your searches and will be something to show to future employers or University interviewers!
NCBI (and remember to use BLASTp)
PubMed (and remember to select Proteins, from the drop down menu)
 A second tip at this stage is to add terms to refine your search. As I said a thorough grounding in classical languages helps with BLAST. So if you want to compare a sequence from man (eg Histone) add homo. If you are looking for a bacterial DNA Polymerase add coli. This will help you select the correct "hit" from the long list. Finally, check the number of amino acids in the sequence you are looking for. This is given in the summary information for each hit. So a 13 aa sequence is not likely to be correct for CFTR which is nearly 1500 aa (use wikipedia if in doubt to find more info about your query sequence). We shall continue with the introduction-search-discuss-search again sessions over the next few weeks.
Key Words BLAST, Primary structure, sequence alignment, NCBI, PubMed
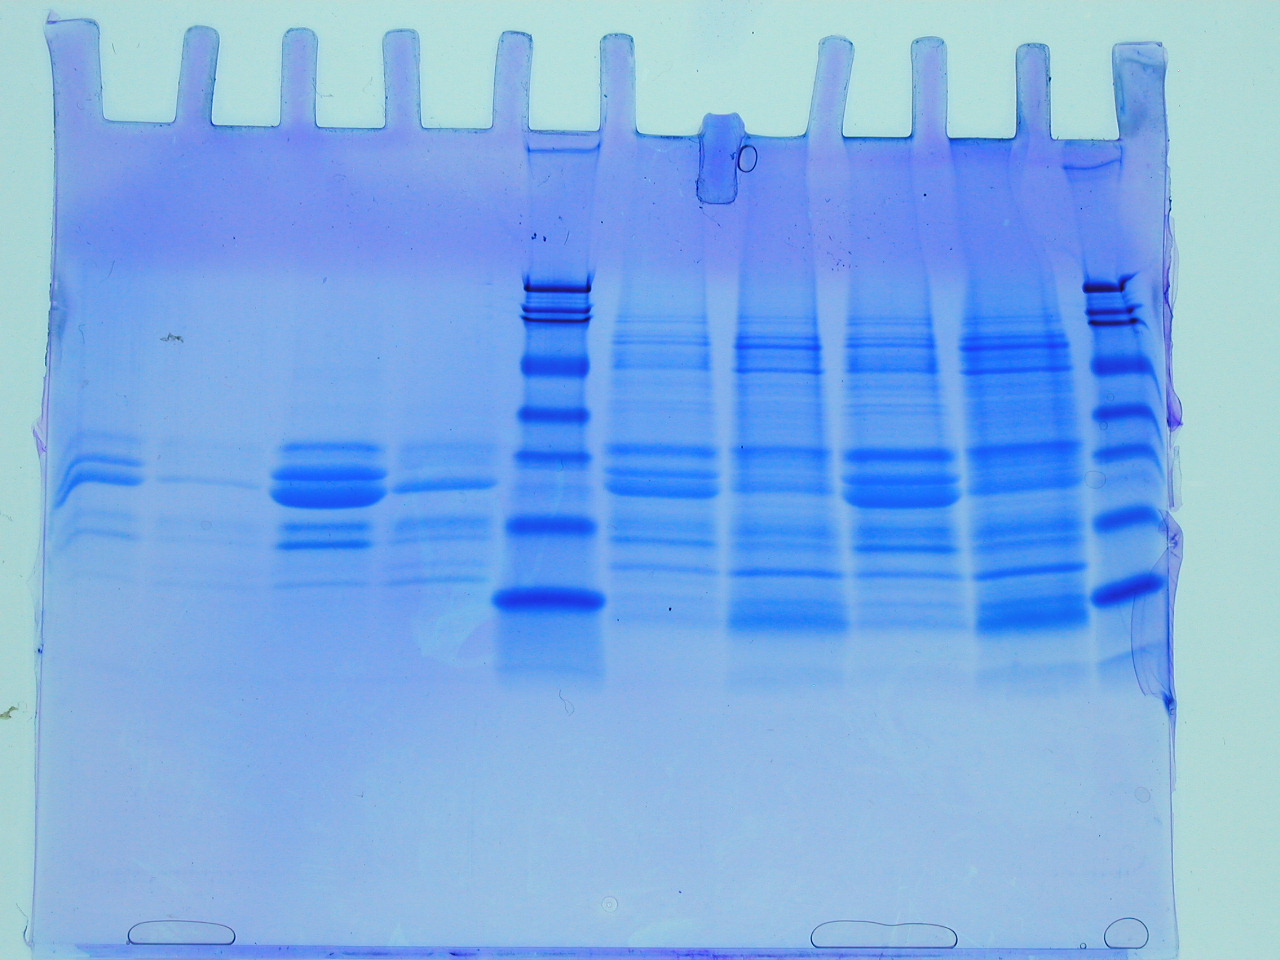
 The first batch of gels were stained and de-stained this week, revealing some interesting observations and some frustrations. The first thing to say is that the gel on the left reveals that the insoluble fraction (i.e. the proteins precipitated by the addition of an equal volume of 80% (w/v) saturated ammonium sulphate led to considerable enrichment of a low molecular weight protein (the blue blob at the foot of the gel). There are between 3-4 visible bands starting from the point where the stacking gel meets the resolving gel. The latter interface is a point where very high molecular weight proteins or often precipitates collect and these should be ignored here. This leaves a feint band followed by a significant band, approximately half way down the gel. The three bands illustrate that proteins of quite different levels of abundance are precipitated by the ammonium sulphate and that they differ considerably with respect to molecular weight. The blob is the lowest molecular weight of the three protein species. So we have quite a lot of information from this first gel. However, there are no molecular weight markers (from which we could deduce the molecular weight of the three bands) and the gel itself isn't a triumph of lab technique! Let's look at the problems.
 First the gel samples contain a relatively high concentration of salt (you added an equal volume of approximately 5M ammonium sulphate to your protein sample: calculate the salt concentration in the sample you loaded onto the gel). Secondly, this was the first time you have loaded samples onto a gel of this type and it is a little tricky (see the middle lanes of the same gel (RHS). Sometimes samples flow over into adjacent lanes. Nevertheless, despite these issues, which can all be overcome with practice, we can see that the value of ammonium sulphate as a simple method for the enrichment of proteins. In fact whilst it is used to achieve some level of purification, perhaps its greatest value it brings, is in concentrating proteins, which can often help stabilise proteins and keep sample volumes down to manageable sizes. What simple technique could you employ to remove the ammonium sulphate from the sample before applying to the SDS PAGE?
Just a few technical points on the preparation and treatment of the gels. The gel is a polymer which is formed from a solution of acrylamide and bis acrylamide. When ammonium persulphate and TEMED are added to a mixture of acrylamide and bis acrylamide, the acrylamide polymerises and the bis acrylamide forms cross links. By adjusting the concentration and proportions of acrylamide and bis acrylamide, the gel forms a "cross linked net" which sieves the proteins. The gel is often made in two parts, with the lower 75% called the resolving gel (often 10% polyacrylamide) and the upper gel, called the stacking gel, often a lower percentage. The stacking gel sets a little slower and it is into this layer that we push a "comb" which is the same thickness as the plastic spacer that allows us to form the gel between the two glass plates. The comb is removed prior to loading samples (which are typically 5-50ul in volume. The gel forms a bridge between the upper and lower buffer chambers and when the buffers contain the detergent SDS, the proteins are generally electrophoresed in such a way that they run as a range of negatively charged "rods" whose length is determined by their primary structure (number of amino acids).
The sample loading buffer contains a few specific components: bromophenol blue is a dye that doesn't bind to proteins, but allows us to track the samples, ensuring that we don't run the gel for too long. The smell is due to the presence of beta mercaptoethanol, a reducing agent which ensures that those proteins containing disulphide bonds are fully unfolded. Finally glycerol is added in order to facilitate sample loading: the density of the blue protein sample making it easy to load into the wells of the gel, and easy to tell if your sample has spilled over into an adjacent lane. At the end of the electrophoresis phase, typically one hour, the clear gel is removed carefully from between the plates (as I demonstrated) and is covered by a solution of "stain". This solution contains Coomassie Brilliant Blue, dissolved in a mixture of methanol, acetic acid and water (hence the smell!). The dye stains both gel and proteins, and we have to actively destain the polyacrylamide with a similar solution (omitting the dye). The whole process of staining and destaining takes a few hours (often destaining is carried out overnight), and the gel is usually contained in a plastic box and gently agitated. In the next methods blog, I will look at the gels that you obtain after the column chromatography step.
Key words SDS PAGE, sample buffer, ammonium sulphate fractionation gel composition
 Today we ran our first samples from the ammonium sulphate fractionation of milk proteins. The gels are looking fine, but I thought I would remind you of the key principles before we provide the class gels on the Y12 Edmodo site. The acronym, SDS stands for sodium dodecyl sulphate (LHS) and you may notice a resemblance to phospholipids: a long hydrophobic tail, capped by a negatively charged group. This molecule is added to the protein samples in order to stabilise the polypeptide chain in an extended (think of an extended, negatively charged rod, a little like DNA?). This renders most of the proteins identical apart from the length of the rod, which in turn is directly proportional to the protein's molecular weight.
 The next part of the acronym, PAGE, stands for polyacrylamide gel electrophoresis. The polymerisation of acrylamide stimulated by TEMED and ammonium persulphate, provides us with a durable medium for the separation of a few hundred micrograms of proteins (of different molecular weights), which can be detected following a staining procedure involving Coomassie Blue, as seen RHS. The banding pattern provides a rapid and sensitive evaluation of the proteins in a sample and is generated as the proteins are separated on the basis of molecular weight differences in the denatured state. It has become a favourite method in all experimental Biology labs since it was pioneered by Laemmli, over 40 years ago (original paper).
Today, we approached milk protein purification empirically and your samples will be as good as the care you took to prepare them. There may be carry over of ammonium sulphate, which can distort the bands, but we shall see soon enough. Some useful tips are:
1. Label and track all samples closely (remember your numbers 1-6 will look the same as those of your colleagues next session!).
2. Take care to add an equal volume of the gel loading buffer (it promotes protein unfolding).
3. Load less than 40ul of your sample and steady the Gilson with one hand. Take your time!
4. Make sure you have recorded the details of each sample carefully and note the lanes on the gel, where your sample was applied.
Key Words SDS PAGE, protein separation, analysis electrophoresis
 For me, liquid chromatography is both an elegant and powerful method for Biochemists. This week we have been looking at its application in the analysis of complex protein mixtures exemplified by bovine milk. In order to familiarise you with the methodology, I have "spiked" the milk with an intense blue dye called "Brilliant Blue" and the resin (column material is often called this by older scientists!) is Fast Flow Q Sepharose. The dye is not only coloured, but is negatively charged, which ensures it binds efficiently to the positively charged beads of the resin (below, RHS). If a bright blue band appears at the top of your column, you know that your experiment is progressing well. It was really nice to walk round and see that hardly any columns had run dry and that the dye began to accumulate as I expected.
 Cell extracts and fluids often comprise many thousands of individual protein species and milk is no exception. The purification of a single protein from such mixtures may seem challenging, but has been successful in many laboratories. However, in our introductory experiment I hope you all observed that some proteins washed straight through the column (theoretically those with a net positive charge, as the beads are positively charged via a quaternary amine, RHS: this is just the same as like poles repelling in bar magnets) and those with a net negative charge remained bound. The bound fraction was eluted (along with the dye) by the application of increasing concentrations of sodium chloride. What kind of column would you use to capture histones?) By refining this process and collecting smaller fractions at a range of salt concentrations we can begin to tease apart the complexity of the mixture. In this way we wont be "wasting pure thoughts on impure proteins" to paraphrase a Nobel Prize-winning Biochemist, Arthur Kornberg!
Key words: ion exchange, chromatography, protein purification, organic dyes